Handy Ramps
Minnesota Members' Approach Used Nationwide
by Kathleen Childers and Charles Wardell
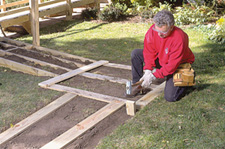
 Club members Bob Zimmerman (far left) and Jim Sueker (left) worked with James Williams (below) to design this portable, modular ramp system.
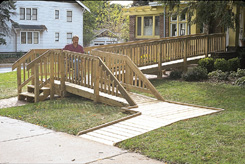 PHOTO BY ERIC AGNESSENS AND STAFF
Club member Bob Zimmerman spends many of his days helping people get safely home. As an independent living counselor with the Minnesota Division of Rehabilitation Services in St. Paul, Minnesota, it's part of his job to make homes accessible for his clients by installing ramps. Not just any ramps, mind you. Bob uses a unique modular ramp system that can be built off-site in sections, installed quickly, and easily moved and reused when no longer needed.
Today, more than 450 of these ramps have been built in Minnesota alone through a program Bob and the Metropolitan Center for Independent Living started called The Ramp Project. In addition, many agencies across the country have adopted the plans. Now you can too. The modular design can be built by an individual (with a helper) or a group. If you'd like to get complete plans and guidelines ($10) and a video ($15), you can write to the Metropolitan Center for Independent Living (see SOURCES).
The modular difference
When Bob began the independent living assignment with the state, getting ramps built proved to be a monumental task. Contractors and materials were expensive, and his clients objected to the disruption to their yards. Ramps built by homeowners often were improperly constructed making them unsafe for the users. On top of that, Bob discovered over the years that many of his clients only needed a ramp temporarily.
Bob figured there had to be an easier and cheaper way to meet his clients' needs. He worked with James Williams of the Metropolitan Center for Independent Living, Club member and contractor Jim Sueker of St. Louis Park, Minnesota, and Rudin Associates, a Minneapolis engineering firm. Together they designed a ramp that would fit Bob's needs and Bob's clients' needs, and would be structurally sound.
 Car jacks work great for temporary, adjust-able support. Use a level to find the proper pitch of the first module.
PHOTO BY ERIC AGNESSENS AND STAFF
Because the ramp is modular, it can be fabricated in a garage, then easily assembled on-site. Jim has built more than 300 of these ramps for Bob's clients. "Sometimes, I build the frames in my garage," he says. "So even if the weather is nasty, I can build the components and get everything ready for the installation."
The ramp is made entirely from pressure-treated lumber. The modules are typically 116 in. or 58 in. long x 39 in. or 42 in. wide, although they can be shortened and narrowed to meet site-specific needs. Right-angle turn landings typically are 58-in. square; 180-degree-turn landings are 58 in. long x 92-1/2 in. or 98-1/2 in. wide.
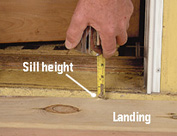
The top landing should be no more than 1/2 in. lower than the door sill. Shim the landing as needed so that it's parallel with the sill.
PHOTO BY ERIC AGNESSENS AND STAFF
The modules are topped with 5/4x6 treated wood decking that is installed after the framed modules are in place. The decking enables water to run off between each board. It dries quickly and the gap between each board helps give better traction.
Bob says many people make the mistake of using plywood decking. An exposed plywood surface can delaminate quickly under heavy traffic. And it can get dangerously slick and icy because there's nowhere for water to drain. Bob knows of one family that threw sand on a plywood ramp in an attempt to make it less slippery. It only made things worse. "The sand was like ball bearings," he says. "A nurse stepped onto the ramp, slipped on the sand and broke her forearm."
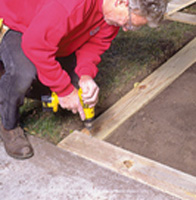
 The first module is bolted to a 4x4 post that is resting on the top step; then the module is attached to the stoop with Tapcon screws.
PHOTO BY ERIC AGNESSENS AND STAFF
Bob's ramps are supported by 4x4 posts resting on 12-in. x 12-in. treated 3/4-in.plywood bearing plates. A traditional ramp - like a typical deck or porch - sits on posts anchored to concrete footings that extend below the maximum frost depth, which can be 4 ft. deep in some parts of the country. The bearing plates make the ramp "a flexible structure," says Bob. There's a joint about every 10 ft. and a cross-support every 5 ft. If there is any movement from frost, the ramp bends and flexes, riding it out like the cars of a freight train. Most heaves are minor enough that nobody notices, and when the ground level returns to normal, so does the ramp. How well does the system work? Bob and Jim say that in the five years they've installed them, they have never had a report of problems.

The other modules are temporarily attached to 4x4 posts, resting on the ground, with screws.
PHOTO BY ERIC AGNESSENS AND STAFF
As easy as the ramp is to assemble, it can be taken apart even more quickly. And because the ground has not been disturbed with footings, it takes little effort to restore the landscape. "Realistically, many ramps are used for only a few years," says Bob. "A ramp that's easy to build and suitable for either short-term or long-term use makes sense. People die, people move and people's physical abilities change."
Great plan, proper pitch
Choosing the location for a ramp should be done with great care and thought, advises Bob. It may not be as obvious as you think. Even though most people have only two choices - the front entrance or the back - many choose the wrong one.
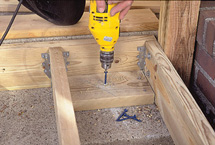
 Modules are bolted together. Holes for the bolts can be drilled when the modules are being assembled on- or off-site.
PHOTO BY ERIC AGNESSENS AND STAFF
Of course, the opening should be wide enough for a wheelchair to get through - 30 in. is required for a standard 27-in.-wide chair. Then once inside, the user must be able to move easily into the house. Finally, there should be enough yard space on the site to accommodate the ramp.
You may be tempted to run a ramp straight out into the yard from the door. If the entry to your house includes steps, however, chances are good that a straight run will result in a ramp that is too steeply pitched. For a ramp to be safe and easy to use, the slope must be very gradual. The Americans with Disabilities Act (ADA) guidelines recommend a slope no steeper than 1:12 - 1 ft. change in elevation for every 12 ft. of length. This means you need 1 ft. of run for every inch of rise. There's nothing to say that you can't make a ramp longer, with a more gradual slope. The degree of slope depends on the user's physical abilities. For example, if a person has a motorized wheelchair, the 1:12 slope might be fine. But if the user relies on his or her own power to wheel up or down a ramp or walk up with crutches or a walker, a more gradual slope is easier to negotiate. "In those cases," says Bob, "you're better off with a 1:16 or 1:20 slope."
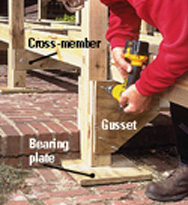
Install plywood gussets with screws to prevent the modules and posts from racking.
PHOTO BY ERIC AGNESSENS AND STAFF
Once you determine the slope, you can figure out how much length you need and devise a layout. A switchback, U- or L-shape is very common. "Don't cheat on the length," warns Bob. "If you do, people won't be able to use the ramp independently. And if you make it too steep, someone can get hurt." The ramp should end at a spot that is convenient to transportation and leaving the property. The bottom of the ramp should be flush with the ground to provide a smooth transition.
Your plan should include landings - an entrance landing at the door and resting or turning landings to break up the slope of the ramp. Both Bob and Jim have seen plenty of ramps with landings that were too small or, even worse, that had no landings at all. The entrance landing must be large enough to allow independent use by the person using the wheelchair.
 The third module of this installation slopes to ground level. The frame and posts are partially buried in the ground but not set in concrete.
PHOTO BY ERIC AGNESSENS AND STAFF
Without a landing, the user would have to back down the slope to open the door - a maneuver that can be dangerous and can make it impossible to use the ramp without help. The entrance landing should provide at least 2 ft. of space to the side of the door latch so the user can open the door from the side of the wheelchair rather than the front. It should be at least 58 in. x 58 in., and the top of the landing should be within 1/2 in. of the door sill.
Resting and turning landings break up continuous slopes and provide ample room for wheelchairs to turn a corner. A resting landing should be placed at least every 30 ft. in a continuous slope. Right-angle turn landings should be at least 58 in. x 58 in. Switchback landings should be at least 58 in. long and wide enough to accommodate ramp sections on both sides.
A landing at ground level creates a level turn area. 1x6 runners are placed in the ground and secured with stakes.
PHOTO BY ERIC AGNESSENS AND STAFF
When you're determining how many modules are required to cover the slope, don't include the landings in your calculations. "It is a common mistake to include the length of both sloped and level sections when figuring out how many modules you need," cautions Bob. "Just remember: The landings do not get you closer to the ground." For example, if you have 29 ft. of slope to traverse with a ramp, you could use two 116-in. modules and two 58-in. modules; the landings are additional.
 The decking is attached to the runners flush with the sidewalk to create a smooth transition.
PHOTO BY ERIC AGNESSENS AND STAFF
Your plan should also include new steps if the ramp blocks existing steps. Before you begin any construction, check with your local building inspector's office to find out what codes you need to follow and if a building permit is needed.
Teamwork
Jim is confident that any skilled do-it-yourselfer could build one of these ramps. "However, if you decide to build ramps as a contractor, you should be licensed and insured," he cautions.

The railing meets standard building codes. The bottom rail serves as a crutch stop; it's placed 4 in. above the ramp to facilitate snow removal.
PHOTO BY ERIC AGNESSENS AND STAFF
The ramp is at least a two-person project, he advises, mostly because you need to transport and install the 116-in.-long modules. Plan on at least two days to do a 20- or 30-ft. ramp. "The initial platform at the door always takes the longest," he notes. "If you have steps leading to the door, you may have to notch the framing to receive the landing, and it may take some time getting it level. You may also have to remove the existing railings to make the landing fit. After that, the rest of the project should go smoothly."
SOURCES
To get the 63-page booklet ($20) that contains plans and guidelines, "How to Build Ramps for Home Accessibility," or the video DVD ($20), "The Ramp Project," call (651) 646-8342 or write to the Metropolitan Center for Independent Living, Dept. AHT, 1600 University Ave. W., St. Paul, MN 55104-3825.
Club member and former carpenter Charles Wardell writes from Vineyard Haven, Massachusetts.
- Links to related articles:
- Decks, Patios & Porches
- Other Projects
|


 © Copyright 1997, 98 North American Outdoor Group, Inc.
  DVD Excerpt:

